Juliano's
Early Ford Top Kit
How-to
by Bob Juliano
HOW TO: INSTALL
A TOP KIT INSERT
A Kit for the home builder
|
| One of the few
areas left in street rod building that the home builder doesnt venture
into is the upholstery portion of the car. Bob Juliano brought this to
our attention several months ago, and agreed to do a series of articles
on how this job can be done at home. Since Bob operates a trim shop, it
was only natural that he offer a kit for the backyard builder. If your
rod is ready for a top insert, follow along as Bob installes a new
insert on a chopped deuce Vickey. |
|
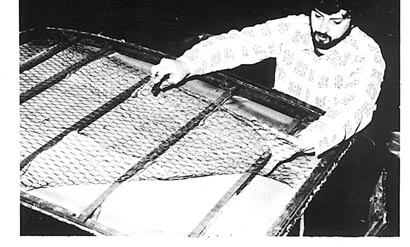
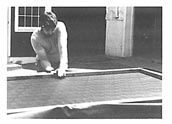
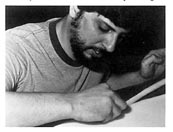
1) First step is to remove all the old chicken wire and
matting. Use care in removing the staples.
2)Check the wood for warpage or rotting and repair as
needed
|
| The first step in
installing a new top insert is to remove all the old material from the
top. This includes the chicken wire and matting. After that is removed,
check the wood to insure that it is in good condition. If the wood is
dry rotted, or cracked, make sure that they are uniform in height. A
long straight edge works well for this portion of the job. After the
wood has been repaired or replaced, it is time to get on with the job
of covering the insert. |
 |
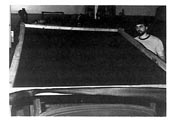
3)Check the top bows with a long straight edge
to insure that the bows are uniform in height. |
| Now take the
aluminum track that is supplied in the kit, and drill 1/8" holes, every
two inches. A wood block should be used for back up, and care must be
taken not to bend the track. After drilling, deburring all holes, to
insure a tight fit to the roof. |
 |
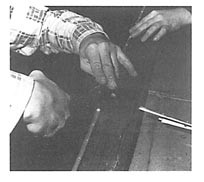
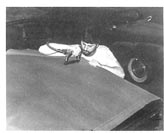
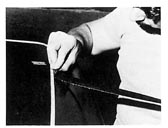
4) Drill a 1/8" hole every 2 inches in the
aluminum track supplied in the kit. Be careful not to bend the soft
track, and debur all holes. |
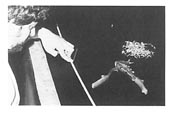
| Now that the track
is drilled, it is ready to be formed. Start on a straight portion of
the roof, 1/4 to 1/2 inch outsid the original to insert. Drill the
first hole through the track, into the roof and pop-rivet the track to
the roof. Aluminum pop-rivets are used for this. Continue this process,
forming the track to the shape of your top insert. Once the track is
formed and riveted every two inches, new holes must be drilled between
the rivets creating holes through the track and into the roof every
inch. Do not waste rivets in these holes, as the track must be removed,
however it is necessary to have provisions for rivets every inch for
the finished job. |
 |
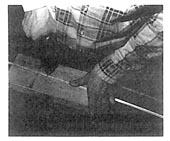
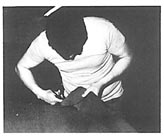
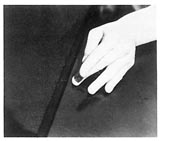
5)Pop-rivet the track to the roof approximately
1/2 inch from the original tack strip. |
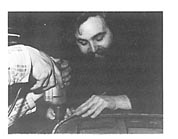
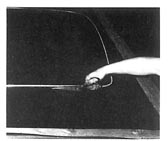
| Using a 1/8" drill
remove the rivets by drilling the heads out. Remove the track taking
care to mark left, right, front, and back. The track is now ready for
the final installation. Carefully set the tracks aside. |
 |
6)Form the track as you go. A friend or wife to
help will make the job easier. |
| The next procedure
is to prepare the vinyl covering for installation. We have discovered
the best way to assure a smooth, tight fitting top is to fasten the
vinyl to a stretcher frame, constructed of 2" by 3" boards. This frame
should be approximately 2" smaller than the vinyl supplied in the kit.
Staple the vinyl to the frame stretching tightly as you go. For best
results the vinyl should be warm. This can be achieved by working in
the sun or by using a heat lamp. When stapling the vinyl to the frame,
in a manner so as to avoid the frame coming in contact with the body.
After the vinyl is stretched, place it and the frame aside.
|
 |
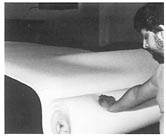
7) After building a stretcher frame form 2 x 3
wood, stretch the vinyl over the frame. The wood frame should be placed
on the finished side of the vinyl. |
| The next step is to
prepare a base for the padding. We have found that a special canvas
works better than the original chicken wire. This special canvas
(supplied in the kit) stretches taut and will not let air through it,
this eliminating the possibility of the top balooning up as you drive
down the road. The canvas staples to the same place the chicken wire
was stapled in the original application. Stretch the canvas tightly as
you go, and staple it to the outer tack strip. A few staples are used
across the bows for extra protection. Trim the canvas with a razor
blade or scissors. Trim very close to the staples. |
 |
8) Staple the special canvas to the tack strip,
stretching it tight as you go. |
| Now that the base
is installed it is time to install the foam padding. Spray contact
cement is used to hold the foam in place. Use a couple of awls or
punches to locate the holes. Then run a razor blade along the inside
edge of the track. Special care must be taken to insure that no foam is
under the track. |
 |
9) Now trim the canvas close to the staples with
scissors or razor blade. |
| Now that the foam
has been trimmed the vinyl material is ready to be installed. The vinyl
supplied in the kit is a high quality vinyl that is completely
waterproof. Place the wood frame with the vinyl attached to it on the
roof. Carefully center the vinyl on the roof. |
 |
10) Lightly spray contact cement on the canvas,
and roll out the foam padding. |
| With the vinyl
centered on the roof, re-install the aluminum track. It is very
important to make sure the track is in the correct position before
riviting. Use an awl to aid in this process. Once the first pop rivet
is inserted, continue riviting every inch until finished. Do not skip
any holes. After all the rivets have been installed, cut the material
leaving approximately 6" of excess and remove the frame from the roof.
Using a razor blade, trim the vinyl close to the outside edge of the
aluminum track. It is important not to cut into the paint or primer
during this process. |
 |
11)Trim the foam to the inside edge of the
track. Care must be taken not to allow any foam to protrude under the
track. |
| All that is left
now is the final trim that snaps on the aluminum track. Install this
finish moulding from the kit, starting at the center rear of the roof,
carefully cut the moulding. A good clean, straight cut here will make
the seam unnoticeable. After checking the fit of the seam, lift up two
inches on either side of the seam, and apply a light coat of contact
cement to either side of the splice. Now re-snap the moulding, making
sure that the seam is aligned properly. The glue will help to keep the
seam tight during the expansion or contraction due to changes in
temperature. |
 |
12)Place the vinyl and frame on the roof of ot
the car, and center it. |
| All that is left
now is the final trim that snaps on the aluminum track. Install this
finish moulding from the kit, starting at the center rear of the roof,
carefully cut the moulding. A good clean, straight cut here will make
the seam unnoticeable. After checking the fit of the seam, lift up two
inches on either side of the seam, and apply a light coat of contact
cement to either side of the splice. Now re-snap the moulding, making
sure that the seam is aligned properly. The glue will help to keep the
seam tight during the expansion or contraction due to changes in
temperature. |
 |
13) Re-install the aluminum track with aluminum
pop-rivets. Dont skip any goles and be sure that you have a rivet every
inch apart throughout the complete track. |
| After checking the
fit of the seam, lift up two inches on either side of the seam, and
apply a light coat of contact cement to either side of the splice. Now
re-snap the moulding, making sure that the seam is aligned properly.
The glue will help to keep the seam tight during the expansion or
contraction due to changes in temperature. |
 |
14)Now trim the canvas about 6 in. from the
track. Be careful not to hit finished paint or body work with the
scissors or razor blade. |
| All that is left
now is the final trim that snaps on the aluminum track. Install this
finish moulding from the kit, starting at the center rear of the roof,
carefully cut the moulding. A good clean, straight cut here will make
the seam unnoticeable. After checking the fit of the seam, lift up two
inches on either side of the seam, and apply a light coat of contact
cement to either side of the splice. Now re-snap the moulding, making
sure that the seam is aligned properly. The glue will help to keep the
seam tight during the expansion or contraction due to changes in
temperature. |
 |
15)Using a razor, carefully trim the vinyl very
close to the track. Hold the excess material up and away from the track
to aid in this process. |
| So there you have
it, a top quaility kit for the backyard builder. |
 |
16)The vinyl molding is snapped in place. The
final seam is carefully cut, and glued in place. The seam should be at
the center rear of the roof. |
|